I had a great week home from Nevada. Came back to a house full of guests up to enjoy the NYS Sheep & Wool festival. I know it sounds hokey, but I've really grown to love these weekends. It's even more enjoyable if you're married to a woman who knits. It's Beth's equivalent to Tap NY or a woodworking show for me. Kudos to Kelly, Ginger, and LuLu for making the weekend an enjoyable one. We missed you Lorena, Sharon, Jacquie, and Sophia. Hopefully next year you'll be back for a reunion tour!
So...while I was back in town, I managed to take a few days off from work to focus on some projects I've been neglecting. The first of which is the casework around the new sliding glass door in the living room. Well over a year ago, I installed a new Andersen slider out to the porch. The door turned out great, but I've been putting off the trim work on the inside because as always, it required custom piecework to make it look good. You see, nothing is easy in my house. Studs aren't where they're supposed to be, walls, floors, etc all all out of square, yada yada yada... I finally worked up the courage to give it a go this week.
The photo below is how the door looked just after install. Not the best photo of the door, but it does have our friends Tim, Cambria, and Baby Calder in it, so it will do :-). Ugly drywall spots, sprayfoam, and unsightly gaps do have a way of drawing attention from the nice door, huh?
I was pleasantly surprised with how it all went. The hardest part was making a custom custom jamb extender to fill the gap between the inside and outside wall. Three pieces, all different dimensions! Once that was in, the rest was pretty straightforward, notwithstanding the adjustments for out of plumb walls. The trim replicated from some of the original colonial door casing in the house. It's made of 3-pieces; flat casing with a bead that I made on the router table, an outer square build-up moulding, and a bed moulding on top. Here's the finished product, sans paint.
One other work-in-progress to report on...My many-months-late jewelry box gift is also nearing completion. I made a small upper divider tray for it last week to complete the woodworking. All that's left is sanding and applying the finish. Here's a few shots as a teaser. I'll post the finished photos and more descriptions of its construction before I send it off, which looks to be mid-december at the rate I'm going.
Happy Halloween all!
Promoting the vast healing powers of sawdust, tools, motorcycling, craft beer, and homebrewing; with an occasional observation or diatribe thrown in for good measure...
Sunday, October 26, 2008
Sunday, October 12, 2008
Catching Up
I've been back out in Vegas for the last 2 weeks, doing the same job I've been working on for the last 2 months or so. Not much has changed since my last post, with the exception of my 401k going in the toilet thanks to the bums on Wall Street and in Washington.
One good thing that has happened since then is a change in work schedule that now gives me both weekend days off instead of just Sunday. This was such a welcome change, since it gives you an opportunity to go out and do something fun on weekends instead of just doing laundry and catching up on sleep. Well, this weekend my buddy Shawn and I decided to trek up to Zion National Park in Utah to hike around a bit and do some sightseeing. It's only 2.5 hours from Vegas, so we drove up on Saturday to see as much of it as we could. From everything I had heard, Zion is unbelievable and shouldn't be missed. This was so true.
We took hundreds of photos throughout the day, as we hiked up Angel's Landing and walked along the Riverside Trail. We packed in as much as we could in just a few hours since we knew it was supposed to rain in the afternoon. Actually, it started snowing about noon! Luckily, we got through the toughest part of the hike before it started. Otherwise, we would have been in for a very rough day. Here's a link to the photos.
We had a great time, and have the sore muscles to show for it. I hope to get an opportunity to go back again and see more of the park. There's so much to see, plus it's really close to Bryce Canyon and Grand Canyon NPs. Hopefully, I'll get back here soon.
Sunday, September 21, 2008
Ahhhhhhhhhh......
That's the sound of...
- hugging and kissing your wife
- taking a shower in your own bathroom
- sleeping in your own bed
- playing with your cats again, and
- sitting on the porch with a cold beer and a cigar.
Tuesday, September 16, 2008
New Addiction...
I have a new addiction, my friends, and it is called a Blackberry...I've been angling at work to get one for some time and have finally gotten my clutches on one. I now completely understand why they're called 'crackberries.' The coolest part is that the new ones also work as a broadband modem for your laptop, which means I'm no longer at the mercy of wi-fi connections in airports, restaurants, or any other places anymore while I'm on the road. Can I get a hallelujah???
Sunday, September 14, 2008
Great Day at Hoover Dam
My buddy Shawn & I decided to go to Hoover Dam today on our day off. I've been wanting to see it for the longest time, so the fact that it's only 40 minutes from Vegas made it a perfect short day trip.
We took the tour to take a look inside some of the tunnels and see the power plant. It was definitely worth it. The scale of the place is breathtaking. I found out that the concrete that makes up the base of the dam is 660 feet thick! Dam(n)... :-)
I took these photos with my phone. They didn't turn out too bad.
8 of the 17 generators that make up the 2080 MW generating capacity of the power plant. These are on the Nevada side of the river.
Friday, September 12, 2008
What would you do?
OK...I get 1 day off a week out here in Vegas (Sunday). For the last few, I've basically slept in, done laundry, and watched TV. I felt pretty good about it too. Well, this is the first week I have a co-worker out here with me and he wants to do something Sunday. With all of this in mind, I'm taking a poll.
What would you do this Sunday?
1. Stay local, sleep, and recharge the neurons.
2. Go gambling on the strip, lose money, and look at all of the goofy mid-westerners
3. Drive ~1 hour each way to Hoover Dam / Lake Mead
4. Drive a long way to the Grand Canyon (don't know exactly how far but guessing it's at least 3 hours).
Happy weekend to all of you who will get 2 days off starting tomorrow. Have a drink for me :-)
Monday, September 8, 2008
Greetings from Mercury, NV
I'm working in the Nevada desert not that far from Yucca Mountain and Area 51, but I'm staying in North Vegas because there's not much else around besides Joshua trees, coyotes, and tumbleweeds. As long as I have a quad-latte from Starbucks at 4:30 AM, the drive isn't too bad...
Here's a sample view of what I see for 60 miles each day to & from NTS to Las Vegas.
----------Sent from my Verizon Wireless Samsung SCH-U740 device
Sunday, September 7, 2008
Finally Doing the Facebook Thing...
I finally decided to take the plunge and start a Facebook profile. Beth ahs been on it for a while and was extolling the benefits of reconnecting with old friends. Well, under a stint of inspiration fueled by my upcoming 20-year HS reunion (no old guy jokes, please!), I decided to give it a try to see how many Lemon Bay HS grads were on it.
Based on what I've heard from others, I should have seen this coming. In one week, I've gotten reconnected with over 30 classmates, old friends, and colleagues that I hadn't spoken with in many years. It's really very easy to find people and get to know them again.
From the viewpoiont of a reformed skeptic, give it a try. I bet you'll be as surprised as I've been in he very first week of trying it.
p.s. glad to be back...:-)
Wednesday, June 18, 2008
road warrior
hey all. i'd apologize for being lazy with my postings lately, but i actually have a valid excuse. work has had me on the road 4 of the last 5 weeks, including right now (blogging from kc).
despite my travel woes, i will try to stay in better touch. cheers, all.
----------
Sent from my Verizon Wireless Samsung SCH-U740 device.
despite my travel woes, i will try to stay in better touch. cheers, all.
----------
Sent from my Verizon Wireless Samsung SCH-U740 device.
Friday, May 30, 2008
This Sucks...
I have tried to not let the whole rising gas prices get to me. However, I'm to the point now where it's getting ridiculous. This is what I see on my drive to work...
Beth actually told me this weekend that I could get a motorcycle. I've always wanted one for fun, but I can see my motivation changing to necessity more every day...
Monday, May 26, 2008
Las Vegas and Kegging Homebrew
Hello All. Sorry for the delay in posting lately, but spent the last 2 weeks in the Nevada desert doing a project for work. I was out at Nevada Test Site, the place where the govt decided it would be a good idea to test a bunch of nuclear weapons back in the 40's & 50's. Trust me, if you're a rad geek like me, there's no shortage of things to work on out there. Don't feel too sorry for me, as I did get in some Vegas party time. No gambling (not really my style), but saw some sights, drank some beers, and had some really great food. It's looking like I'll have to spend more time out there this summer, so perhaps I'll do some gambling then. Here's the view from my hotel the first week. Not bad for a camera phone...
The latest batch of homebrew was started before I left for Vegas, but didn't get done until I returned. The batch is an extract kit from Northern Brewer based on a Fat Tire clone recipe. It's not all that close to the original, but it's still really good. This is my second time brewing it, but the first time kegging. More on that later... The Yellow Jacket Amber name came about when I noticed that a yellow hjacket landed in the brew kettle during the boil. Poor sucker didn't know what hit him, but since he didn't drink much and I've got the Ga Tech connection, the name just stuck.
Since my last brewing post, I've got some upgrades. Mainly, I'm doing full wort boils now (thanks to a honkin' turkey fryer burner). This allows Russ & I to do most of it outside, which makes Beth happy since I no longer occupy the kitchen while brewing. :-)
The shop now doubles as a brewhouse, as seen by the workbench being occupied by a fermenting carboy. The blue thing is my temperature controller, which I have in line with a heater that's wrapped around the carboy to make sure I keep a nice & even fermentation temperature throughout. I'm learning that temperature control is one of the keys elements in going from making so-so beer to really good beer. That, and making yeast starters, which I'm doing now too :-)
And after about two weeks, we racked the beer into one of my newly purchased 5-gal Corny kegs. These are actually used Pepsi soda kegs that are cleaned, filled and pressurized with CO2. These things are cheap and readily available these days since soda distributors don't really use them anymore. And let me tell ya...I've seen the light! I may never bottle a batch ever again. Having to clean only 1 container instead of 40 is a blessing I can hardlt describe. Plus, it's just too damned cool to be able to pour DRAFT beer at home! DRAFT BEER! All it took was removing a shelf from the beer fridge to fit the keg and CO2 bottle. I've got room for 2 kegs in there at a time and have already begun the thought process of installing faucets in the front door. Yeah, Baby!
The next batch is going to be a hopped-up version of the same recipe to make it more of an American Style Amber. I hope to have it in the fermenter by mid-June.
Friday, May 2, 2008
Lunch Time Fun
Benefits of working across the street from a bowling alley! Even better, when I went in, I saw Mikey from OCC shooting scenes for an upcoming American Chopper episode! I took a camera phone shot, but must have forgotten to hit the save button :( Anyway, If you see a bowling alley scene on American Chopper, I was there. WooHoo!
Be a better friend, newshound, and know-it-all with Yahoo! Mobile. Try it now.
Thursday, May 1, 2008
Happy Birthday Auntie Dee Dee!
Last weekend I traveled back to the homeland, Chicago, to celebrate my Auntie Dee Dee's 75th birthday. This was a surprise party organized by my cousins Theresa, Rosie, and Rita. I come from a very large extended family on my Mom's side. My Mom is from a family of 11, so even if all of my aunts & uncles had small families of their own, it would be a rather large family. Well, Auntie Dee decided to have 9 kids! I stopped doing the math years ago, but figure I have close to 50 1st & 2nd cousins just on my Mom's side! Here's a photo of me with the birthday girl. It was funny as she didn't recognize me at first. Guess losing all that hair made me incognito...
Here's one of me with my Uncle Joe. He's my Mom's younger brother and one of my namesakes. My grandfather was named James Joseph, so Mom just switched the names to get mine. As you can see, we have alot in common. I can easily see myself looking just like him in 30 years.
And here's a shot of Auntie's Dee Dee's clan (at least a portion of it, with in-laws). It was great fun hanging with all of them, catching up on old times, and getting drunk along the way. I hope we get many more chances to do this in the future.
Happy Birthday, Auntie Dee Dee. Hope you have many many more to come :-)
Tuesday, April 22, 2008
Southwest Rules
All airlines should be this cool. comfy chairs with their own ac & usb power supplies. makes waiting for a plane enjoyable
Be a better friend, newshound, and know-it-all with Yahoo! Mobile. Try it now.
Monday, April 21, 2008
what he said...
Figured out how to get photos from the phone to the blog...Couldn't resist this one as an inaugural photo (Not that I feel this way about my typical Blog readers). :-)
Happy Monday!
Happy Monday!
Sunday, April 20, 2008
Refurbishing Old Tools
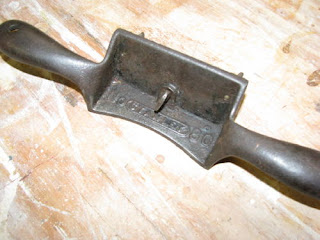
I bought an old Stanley #80 cabinet scraper off E-Bay a few weeks back. These tools are really great for fine-tuning and preparing surfaces for finish. The one I bought wasn't in great shape, but it was cheap ($20) and with a little work can be back in fine working order. Here's a photo of the one I bought.
The photo isn't a really great one, but you can see the surface rust and lack of japanning (paint). Most of the rust was on the underside (out of view in photo). It will work as-is, provided it has a good burr on the blade, but thought it would be fun to try to bring it back as far as I can. This link shows one in mint condition (go to the middle of the page). I'm not planning to go crazy with the restoration, but it should look good when done.
Step 1 is rust removal. I've been reading about electrolysis for some time and finally had a project to try it out on. After picking up a few supplies at the hardware & grocery stores, it only took me ~30 minutes to get my rig up & running. Here's what it looked like.
The bucket had dissolved washing soda in it and the leads from the battery charger were hooked up like the instructions said. It only took ~30 seconds to see bubbles rising from the electrodes. Very cool indeed. The first photo below is what it looked like after 30 minutes. BTW, the scraper is hanging from a wire in the center of the bucket (attached to the negative (black) lead).
And overnight...
And here's the intermediate results after some brief cleanup with a wire brush on a dremel tool. All of the deep pitted rust is gone and the cast iron has a bit of a sheen again. It could use a bit more work before I attempt to apply paint, but it should be finished in no time. I'm looking forward to the Stormville Flea Market again on Memorial Day weekend. I'm no longer afraid of buying ugly, abused, rust covered tools.
Friday, April 11, 2008
Bloggin from the phone
finally got mobile blogger set up
for on the phone. can't seem to post cameraphone photos yet, but will soon hopefully.
Beth & i have the day off, so we're out and about. here's to everyone else who doesn't have to work today. and to those who do!!
----------
Sent from my Verizon Wireless Samsung SCH-U740 device.
Tuesday, April 1, 2008
Makin' Baloney...
Trust me, I reacted the same way to these words as you probably just did. I was invited up to Sullivan County (only a few miles from the location of the original Woodstock - actually Bethel, NY) to spend the weekend 'making baloney' with my friend Matt & his family. Seems that these friends refer to all smoked sausage as baloney, regardless of the type, in much the same way people refer to all cotton swabs as Q-tips, I guess. Once I got past the odd name for what was actually going on, the whole thing seemed a bit more normal.
This weekend festival has been a family tradition for these folks for many years now, and I now have first-hand experience to the festivities. Nearly all of these guys are hunters, and they use a lot of the venison from the previous year's take in the sausage. It also has some pork in the recipe, but that's about all I can say. I've been sworn to secrecy... We made 3 different varieties on Saturday; a normal smoked sausage, a summer sausage, and their version of a slim-jim. All of it was made from scratch and smoked in their little shack behind the garage.
This is what the first recipe looked like when it was placed in the smoker. They call this variety 'Ring Baloney'. Bet you can't guess why...
While the first batch was in the smoker, we worked on the other two batches. The photo below is just a sample of how much was made. In all, we ground and stuffed about 400 lbs of sausages. Seeing the assembly line in action was quite amazing. Let me tell ya, all of it tastes awesome. These guys have the whole process down to a science.
After a full day's worth of sausage-making, we sat around the garage and basically got drunk. That too is part of the tradition, or so I was told. Once everyone woke up the next day, we took a quick trip up the mountain to the place where Matt's Uncle owned a large farm. It's now where they all hunt, as it's ~300 acres of rolling hills and beautiful scenery. I set the camera on black & white as it seemed to fit the surroundings. Here's a few of the best shots I got.
We headed back to Montgomery about noon, totally exhausted and smelling like a couple of guys from a meat-packing plant. I was never more happy to take a shower and get a nap.
Sunday, March 23, 2008
Sump Pump is Done!
I took Friday off as a vacation day, so I had a nice 3-day weekend to work in the basement getting the sump pump plumbed in and wired. The system went together pretty well, although a few of the items were challenging since I was doing everything solo. The first thing I saw when getting back into the project was the 14" of water in the basin, resulting from the 1.5" of rain we had on Tues/Wed of last week. This means that the water table was only 12-16" below the basement floor. Seeing this only reinforced the need we have for this system. If we get drenching rains this Spring like we had in the past, this system will pay for itself the first day it kicks on.
The plumbing is all PVC, with the piping running through the ledger board and meeting up with the downspout drain we had installed when the footing drains were also done. Here's what the system looks like (inside & outside):
I was initially planning to run the piping straight out the wall, but that would have include digging a new ditch through the trees to the right, which didn't thrill me. Jason (the friend who helped dig the hole) suggested tying into the downspout drain since the PVC piping is already in place and runs to daylight out by the street. This solution took a bit more plumbing work, but it was well worth it. All it took was re-directing the downspout a bit around the other side of the wall (shown in third photo). I was also planning ahead a bit with this since the downspout would likely be in the way on the sunroom addition Beth has her eye on...(more on that later. Hopefully, much later).
Wednesday, March 19, 2008
Working Toward a Dry Basement (Forever)
Hey All. My plans for Sunday changed on Saturday night, when after a company dinner with a bunch of people from Beth's office, two of our friends turned to me and said "Guess we'll see you at 9 AM tomorrow." Given my short attention span, I had no idea what they were talking about. Turns out that a few weeks back, I mentioned in jest that they should come over and help me dig a sump pump pit in my basement. Well, they didn't forget. And being the opportunist that I am, changed whatever plans I may have had on Sunday to make sure I took advantage of their generosity.
For those of you who haven't been reading Beth's blog for the last few years, our basement has been the bane of our NY existence. We've had serious flooding down there at least 3 times since we moved in. Some serious enough to toast our old furnace and water heater. The new foundation and footing drains took care of most of the problem, but there's still a need for the sump, if nothing more than insurance policy.
As planned they showed up at 9 with shovels in hand. It took us about 3 hours to dig the 30" deep by 20" wide hole. This was due to the fact that the clay in the basement was as hard as rock. Once we got past 12" or so, we had to use a steel rod to cut the clay in pieces small enough to scoop out. This process got us down about an inch at a time, and led to frequent exhaustion that comes from ramming a steel rod into the ground repeatedly.
That's Matt, Jason, and me (left to right) with said steel bar leaning against the basement wall.
Here's the semi-finished product. I'm extremely glad the digging is done and the sump pit is in the hole. It will eventually have a lid with PVC piping coming out the top, all of which I hope to finish next weekend. I have grand plans to pour some concrete down there as well, but we'll see where that falls in the overall priority list.
Sunday, March 2, 2008
Bathroom Chronicles, Vol. 6
Hello All. Long time since I posted about the new bathroom. It's mostly because I'm lazy, but also because the bathroom itself is done (well, 98% so anyway :-)).
One peripheral task that's been sitting out there is the wall on the other side of the new shower stall. I tore the wall out to allow the plumber's to run the new pex supply tubing and PVC drains and vent. Ever since, we've been looking at an open wall with framing and pipes. Well, no more! I decided to close it all in by extending the hallway to the attic doors and building a soffit to enclose the new heat register that was recently installed. Here's some photos of the work in progress:
Shower wall with new framing and first piece of drywall
What I have left to do is about a week's worth of mudding and sanding, followed by new paint. By the time Snarktoberfest, the Sequel comes about, it should look all spiffy. Here's hoping that comes true!
Beer Fridge !!
Wanna know how cool my wife is? She too thought that getting a beer fridge for the shop would be a good birthday present!! I must admit that there is a bit of back-story here, but the overall premise is still true.
The prospect of getting said fridge was borne out of our friends Russ & Roe, who have a similar fridge in their garage. The difference being that Russ has filled that fridge with beer and had 5 more cases sitting on the garage floor! You see, Russ is more of a beer collector than a beer drinker, so the rate with which he buys dwarfs the rate at which he consumes. It's rather said, actually, but he shares much of his bounty and I'm grateful for it.
When Roe threatened to take their fridge back, Russ was faced with a quandry... where to put all of the displaced beer? Well, like a good soldier who's willing to take one for the team, I stood up and said, "I'll Take It." :-) and Just like that, I had a full-size fridge delivered to the house to help my dear friend out. The photo below happens to show my two favorite additions to the shop: the fridge and my 16" Laguna bandsaw.
And this is what 5 cases of great micro- and foreign brews look like in the new fridge. It's OK, feel free to take a moment if you need to...
What I truly love about this one is there's no freezer and it's equipped with an internal heater so you can keep it outside in the winter without the contents freezing. This was key since I only heat my shop when I'm out there. The longer-term plan is to put a kegerator kit in the door so I can keg my homebrew. The bottom shelf should be just high enough to fit 5-gal corny kegs. Yeah, Baby!!
Monday, February 18, 2008
A Necessary Evil
I guess evil is a strong word, but it gets my point across. What I'm referring to is tool sharpening. In reading as much woodworker stuff as I can get my hands on, one central tenet of all the masters is the same: you must work with sharp tools. Basically, if you try to do handwork with dull tools, you're going to get frustrated and tired. Frustrated when the pieces look awful or don't fit and tired by having to wail on a chisel to get it to cut.
I got a reminder of both this weekend when working on J's jewelry box. I'm hand-cutting through dovetails for the box joinery, which requires a fair amount of chisel work to get the pins & tails square and fitting nicely. Let's just say I didn't get off a great start. I stopped after being horrified by the amount of tear-out I was getting from my dull chisels. I must at least give myself a little credit for stopping before I would be forced to use the 4 pieces of mahogany as firewood.
Yesterday's activity was getting the chisels back to form. I've been using the Scary-Sharp method, which uses ordinary sandpaper to hone chisel & plane irons. I buy 400 - 2000 grit automotive paper and work my way up the grits until the metal looks almost like a mirror. The hardest part is flattening the backs of the chisels first so you can actually generate a nice edge. Unfortunately, chisel backs are anything but flat when you first buy them. Here's a nice step-by-step description of the process I generally use (sans waterstones for now). Once the backs are flat, honing the bevel is easy. After about 5 minutes or so, they're sharp enough to shave the hairs off my arm. Not their primary purpose, mind you, but it is a good test of sharpness. :-)
The sad part about yesterday is that I had to quit working in the shop before I had a chance to put them to work. Hopefully, I'll get out there tonight after work since it's a balmy 53 F today. Happy Monday, everyone.
Sunday, February 10, 2008
I Finally Got My Shop Back
Hey all. Has it been over 2 months since I last blogged? Of course it has because this is me and I'm quite possibly the worst blogger ever (well, not in content, but definitely in frequency).
I got a bug to write again because I got a nice e-mail from a few windsor chairmakers out in Missouri who found this blog through my instructors' website. Turns out they studied together at the same place and are also professional chairmakers. It was nice to hear from them.
The good news is that the workshop has been busy again lately. I've made it a point to reclaim the shop from the storage area it had become during the bathroom remodel, so over the last 3 weeks I've been doing just that. I basically cleaned it all out (found out that several local mice had been feeding on a bag of birdseed - yuck), moved some stuff around, made a few upgrades, and got it back in working order. The upgrades are a few small cabinets for extra storage that I'v ebeen thinking about forever. They're nothing fancy, but they do manage to keep some tools and supplies from getting dusty, which is key in a shop with little or no winter ventilation. Here's what the weekend oasis looks like now. It looks more crowded than it actually is. There's alot of multi-tasking going on with the benches and equipment.
In fact, I have several projects in progress as we speak. I'm building a jewelry box for a soon to be 13-year old niece (shhh, don't tell her), and have been experimenting more with my lathe. I really want to do more turning, starting with spindles and working my way up to bowls. The first project will be legs and stretchers for a few windsor stools. These have been in the offing ever since I finished my sackback chair over a year ago. I'll let you know how they turn out.
I'm off to Pittsburgh tomorrow for a business trip, so wish me luck that I don't get stuck somewhere due to snow, wind, or both... Have a good week.
Subscribe to:
Posts (Atom)