After much consideration, I decided to go through with the Executive MBA program at BSU. Went to the new student orientation, met some of my classmates, and received my first assignments. Its all good so far but then again, the fun hasn't really started yet.
Promoting the vast healing powers of sawdust, tools, motorcycling, craft beer, and homebrewing; with an occasional observation or diatribe thrown in for good measure...
Monday, August 26, 2013
Tuesday, August 20, 2013
Back in The Shop
Our friends D&D wanted chairs with a curved back pattern, so we decided to go with Norm Abram's design from the New Yankee Workshop. I have one of Norm's books that provides the plan and layout for templates, so that made getting started pretty easy. The wood we choose we reclaimed redwood from my old deck, which was replaced last year with Trex. I am glad I saved the old 2x6 redwood boards since a project like this is perfect for them. It took quite a bit of time jointing, re-sawing, and planing the old deck boards into usable 4x stock, but it was worth the effort. We ended up with ~200 bf of usable boards with really nice character. The photo below shows the stack of redwood after the considerable milling was done.
The process included sorting the boards for the best stock, tracing the outlines of the templates, rough cutting the shapes on the band saw, then trimming the stock to the template using a pattern cutting bit on the router table. After a little finish sanding, the chairs were ready to be assembled. Each chair took about 8 hours from start to finish. We also decided to make a couple of footrests after chairs were done. These weren't included in the original plan but they were pretty easy to adapt to match. Each footrest took about an hour. Below are photos of the finished chairs and footrests. The first is in my garage right after assembly. The last two show them in their final resting place, on D&D's beautiful new patio. They're planning to apply a simple clear finish to let the color and grain pattern of the redwood to come through. These should provide years of comfortable backyard seating around the fire pit.
Monday, July 15, 2013
Latest Project
An early teaser photo of the latest shop project. One more of these on the way along with some foot rests to match. Should make a nice addition to D&D's new patio! Stay tuned for more.
Saturday, March 30, 2013
Oufitting the V-Strom Part 2
Since the last V-Strom post, I decided to add a few circuits to the fus.e block that I could use for electronics and heated accessories. Following several posts on VSRI and Stromtroopers, I ordered a custom dashboard shelf specifically designed and fabricated for V-Strom motorcycles. It's designed to receive panel mount power plugs and other accessories that you want to install and use on a motorcycle.
I decided to install a standard 12-V power socket and a specialty 12-V Powerlet socket used a lot on BMW motorcycles. Powerlet makes great heated gear for cold weather riding and I wanted the ability to upgrade to heated gloves, grips, or even a vest in the future. Below are some photos of the completed install. The shelf bolts perfectly to the top of the front fork mount using existing bolt holes. It was installed in less than 15 minutes. Easy!
I ran the lead wires under the fairing and gas tank back to the fuse block, keeping everything hidden. Both were added to the switched power circuits on the block, helping to prevent draining the battery if I forget to unplug something. Both plugs get 12V supplied as soon as the key is turned on.
The first application for the 12-V plug was a RAM phone/ipod mount for navigation, music, whatever. The Ram mount bolted into the mirror extenders I installed last year. The phone sits securely in a spring-loaded mount and is ultimately adjustable. Below is a photo of the phone installed with the mobile charger plugged in.
I also had a center stand installed by Carl's Cycles over the Christmas holidays. A center stand is great since it takes weight off of the tires and makes working on the bike much easier. It installs behind the factory kick-stand so I can use either one independently.
Now that the weather is getting warmer, I'm looking forward to some longer rides where I can take advantage of these new upgrades.
I decided to install a standard 12-V power socket and a specialty 12-V Powerlet socket used a lot on BMW motorcycles. Powerlet makes great heated gear for cold weather riding and I wanted the ability to upgrade to heated gloves, grips, or even a vest in the future. Below are some photos of the completed install. The shelf bolts perfectly to the top of the front fork mount using existing bolt holes. It was installed in less than 15 minutes. Easy!
I ran the lead wires under the fairing and gas tank back to the fuse block, keeping everything hidden. Both were added to the switched power circuits on the block, helping to prevent draining the battery if I forget to unplug something. Both plugs get 12V supplied as soon as the key is turned on.
The first application for the 12-V plug was a RAM phone/ipod mount for navigation, music, whatever. The Ram mount bolted into the mirror extenders I installed last year. The phone sits securely in a spring-loaded mount and is ultimately adjustable. Below is a photo of the phone installed with the mobile charger plugged in.
I also had a center stand installed by Carl's Cycles over the Christmas holidays. A center stand is great since it takes weight off of the tires and makes working on the bike much easier. It installs behind the factory kick-stand so I can use either one independently.
Now that the weather is getting warmer, I'm looking forward to some longer rides where I can take advantage of these new upgrades.
Monday, December 31, 2012
Miter Saw Station Upgrades
My NY shop wasn't perfect but over the 9 years I was there, I had enough time to get it outfitted to the point where it was very efficient. My Boise shop is still a work in progress to that point. One area that needed particular attention was the miter saw station. I built a nice station in NY with a stationary saw position, 5' outfeed table, and a movable stop for repeatable cuts. Unfortunately, I left that bench with the house when we moved. The miter saw area in the new shop has been essentially temporary for the last 2 years (saw not secured to the table, no outfeed table, you get the picture... Well, that all changed over this Christmas break.
I decided to follow a design I saw in Fine Woodworking magazine, where the saw sits in the middle and has infeed and outfeed tables on both sides. Also on the agenda was a dust collection shroud in the back for a dedicated 4" run to my new Delta 50-760 dust collector.
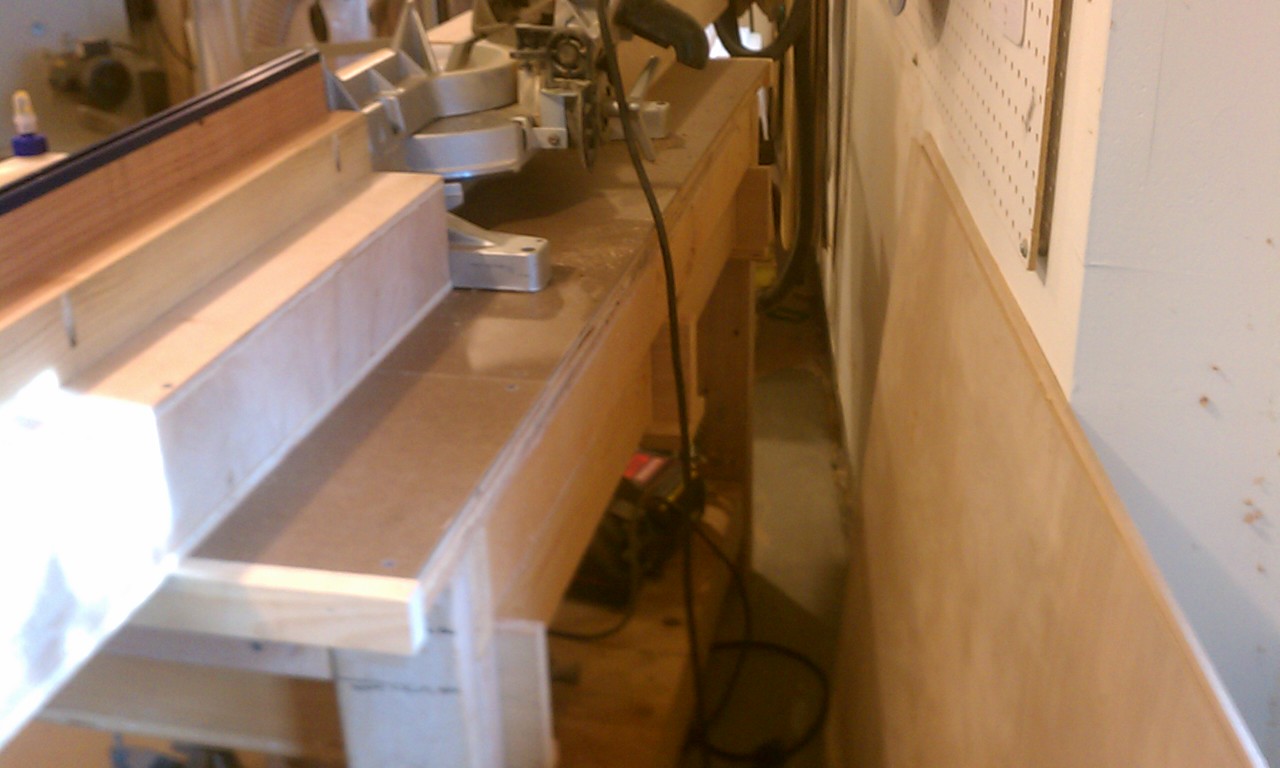
The bench the saw currently sits on is only 5' wide, so that made designing of the infeed/outfeed tables a challenge. I knew a portion of each would be cantilevered, and kept that in mind when choosing a size. Each extension is 3' in length and hangs off the table ~18" as shown in the photo below. I built them as hollow boxes out of plywood using rabbit joints. Each box is designed to be removable with the top surface screwed down with no glue. Removing the top allows access to 4 screws that attach each extension table to the underlying bench. Having worked in enough shops and knowing that a woodworker will often change his mind about things, I thought it best to have a backup plan!
I added a custom stop to the fence by attaching 2 pieces of 36" t-track from Woodcraft to the top and fabricating a custom glide that straddles the top of the fence. A plastic knob with an attached bolt connects to a sliding t-bolt that rides in the track. I can now move the stop to any position on the fence in a matter of seconds for repeatable cuts.
Below are photos of the completed station with the dust shroud installed. It does a great job of collecting just about every dust particle that shoots out the back of the saw. The shroud also allows a 4" hose connection which maximizes the suction velocity from the dust collector. The installed fitting on the back of my Dewalt DW705 is 1-1/2", which is essentially worthless. My miter station will now be one of the cleanest areas of the shop, instead of one of the dustiest.
I decided to follow a design I saw in Fine Woodworking magazine, where the saw sits in the middle and has infeed and outfeed tables on both sides. Also on the agenda was a dust collection shroud in the back for a dedicated 4" run to my new Delta 50-760 dust collector.
The bench the saw currently sits on is only 5' wide, so that made designing of the infeed/outfeed tables a challenge. I knew a portion of each would be cantilevered, and kept that in mind when choosing a size. Each extension is 3' in length and hangs off the table ~18" as shown in the photo below. I built them as hollow boxes out of plywood using rabbit joints. Each box is designed to be removable with the top surface screwed down with no glue. Removing the top allows access to 4 screws that attach each extension table to the underlying bench. Having worked in enough shops and knowing that a woodworker will often change his mind about things, I thought it best to have a backup plan!
I added a custom stop to the fence by attaching 2 pieces of 36" t-track from Woodcraft to the top and fabricating a custom glide that straddles the top of the fence. A plastic knob with an attached bolt connects to a sliding t-bolt that rides in the track. I can now move the stop to any position on the fence in a matter of seconds for repeatable cuts.
Below are photos of the completed station with the dust shroud installed. It does a great job of collecting just about every dust particle that shoots out the back of the saw. The shroud also allows a 4" hose connection which maximizes the suction velocity from the dust collector. The installed fitting on the back of my Dewalt DW705 is 1-1/2", which is essentially worthless. My miter station will now be one of the cleanest areas of the shop, instead of one of the dustiest.
I also took this opportunity to fix a nagging problem with the workbench drawers. I accidentally built them too long for the frame, so they extended beyond the back by about an inch. Normally, this isn't a big deal. However, when there's dust flying out the back of a miter saw above, the drawers will tend to be filled with sawdust! Yeah, it really sucks when you open the drawer to get a tool and have to go digging around to find it. The fix was relatively simple and involved cutting the back off the drawer to the correct dimension and reattaching it. I unfortunately had to cut off some half-blind dovetails but oh well. It is only a shop cabinet after all. Below are before and after photos of the drawers.
Before
and after...
Now that this project is done, I can focus once again on making jewelry boxes for my last 2 nieces. I'm WAY overdue on getting these done. Happy New Year everyone.
Saturday, December 29, 2012
Bar Project
It's been a very busy month and I've been wanting to post on several topics for over a month. Now that I have some time off, I'm going to catch up with several all at once.
My buddy Derek bought a new house recently which has a nice built-in wet bar in the living room. Since it shared a wall with the garage Derek had an idea to run draft lines through the wall and install his draft towers directly on the bar top. Sounded like a damn good idea to me so I took it as a project to help him out.
Below is a photo of what we started with. It's not the best photo but it's the only one I had. The bar top and backsplash were covered in lovely white 1970's formica and the sink (covered by cardboard boxes in the photo) wasn't attached to the countertop.
The renovation plan included replacing the bar top and backsplash with maple and finishing it with a thick coat of epoxy so it looks like a commercial bar. We decided to remove the formica backsplash but not the bar top since Derek wanted the job to get finished in less than a month...
I went with laminated maple strip flooring for the top and 3/4" soft maple to trim out the front edge and make a new backsplash. The flooring was glued directly to the formica then wrapped with the maple boards to finish the carpentry. Holes were cut in the top to reinstall the sink and place the draft towers. The beer lines were run under the counter and directly though the wall into the garage through a collar we added to Derek's kegerator.
The epoxy proved to be a bit of a challenge since it doesn't flow like typical oil based finishes but after 2 coats (and quite a bit of sanding) it came out quite nice. Below are two photos of the finished bar. The epoxy ended up placing as 3/16" layer of high gloss clear protection over the maple.
My buddy Derek bought a new house recently which has a nice built-in wet bar in the living room. Since it shared a wall with the garage Derek had an idea to run draft lines through the wall and install his draft towers directly on the bar top. Sounded like a damn good idea to me so I took it as a project to help him out.
Below is a photo of what we started with. It's not the best photo but it's the only one I had. The bar top and backsplash were covered in lovely white 1970's formica and the sink (covered by cardboard boxes in the photo) wasn't attached to the countertop.
The renovation plan included replacing the bar top and backsplash with maple and finishing it with a thick coat of epoxy so it looks like a commercial bar. We decided to remove the formica backsplash but not the bar top since Derek wanted the job to get finished in less than a month...
I went with laminated maple strip flooring for the top and 3/4" soft maple to trim out the front edge and make a new backsplash. The flooring was glued directly to the formica then wrapped with the maple boards to finish the carpentry. Holes were cut in the top to reinstall the sink and place the draft towers. The beer lines were run under the counter and directly though the wall into the garage through a collar we added to Derek's kegerator.
The epoxy proved to be a bit of a challenge since it doesn't flow like typical oil based finishes but after 2 coats (and quite a bit of sanding) it came out quite nice. Below are two photos of the finished bar. The epoxy ended up placing as 3/16" layer of high gloss clear protection over the maple.
Monday, December 17, 2012
Brewing News - Good and Bad...
First the bad. I poured 10 gallons of beer down the sink this weekend. Found out the oatmeal stout I brewed a month or so ago went horribly wrong. It either got infected or was made with a bad pitch of yeast. I re-pitched the 1056 cake from my last IPA (which turned out great) so I'm not quite sure where the snafu occurred. The beer had a telltale medicinal taste to it, which points to a bacterial infection. Regardless, that batch has been scratched from my memory forever and this is the last I will speak or think of it. Besides one last point... I have made a decision to no longer harvest yeast for future use. Despite my successes in the past with this practice, I'm come to the realization that I'm too busy (and too lazy)
Now the good. The sour cherry batch came out fantastic! The amount of tart cherry juice I added (24 oz per 5 gallons) tastes just right. The beer is beginning to show more Brett flavor now as compared to the lacto tartness that came out first. It will likely continue to change as it matures and as the bugs have more time to eat the cherry sugars. However, I doubt the keg will be around long enough to document much more change. Think I will start another batch soon since this one took 5 months to make!
Subscribe to:
Posts (Atom)